


This tutorial will help to setup React app With auth0 in simple steps or know exactly where to place the code and what setting you need to use start with react app with auth0.
How to setup react app authentication with auth0
Follow these 15 steps will help you to create authentication with auth0.
1. Open terminal and run this command
npx create-react-app react-with-auth0
2. After installation you need to run this command to enter in react folder
cd react-with-auth0
3. Now you can start react.js by simply using
npm start
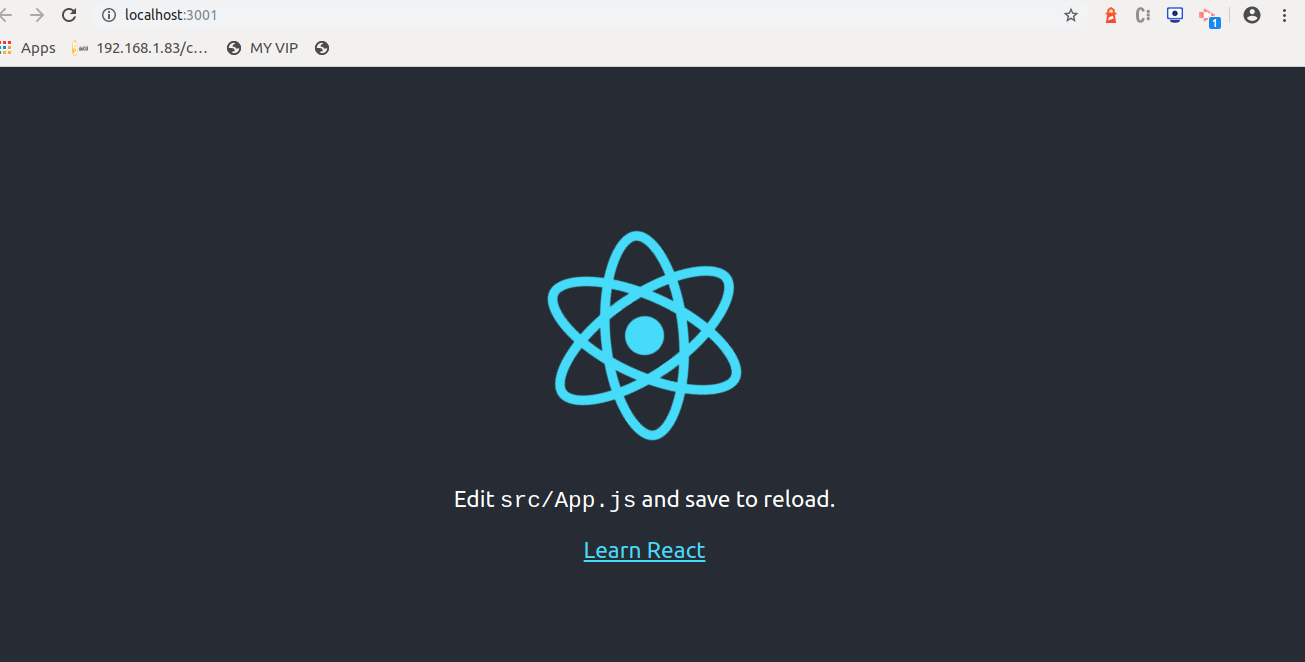
After you complete all three steps you will check your screen or it will be display such as below screen.
4. Now we have to install react router dom and react router for handling navigations in our app
npm i react-router react-router-dom
5. Update src/index.js
import React from 'react';
import ReactDOM from 'react-dom';
import { BrowserRouter } from 'react-router-dom';
import './index.css';
import App from './App';
import * as serviceWorker from './serviceWorker';

ReactDOM.render(
<BrowserRouter><App /></BrowserRouter>, document.getElementById('root'));

// If you want your app to work offline and load faster, you can change
// unregister() to register() below. Note this comes with some pitfalls.
serviceWorker.unregister();
6. Configure an Auth0 account
We will need to signup to Auth0 and integrate it in our application. If you do not have an account then click here to sign up for free auth0 account. This comes with some features such as :
- Lock for Web, iOS, Android
- Universal Social Login
- Integrate Application Authentication
- Community Support
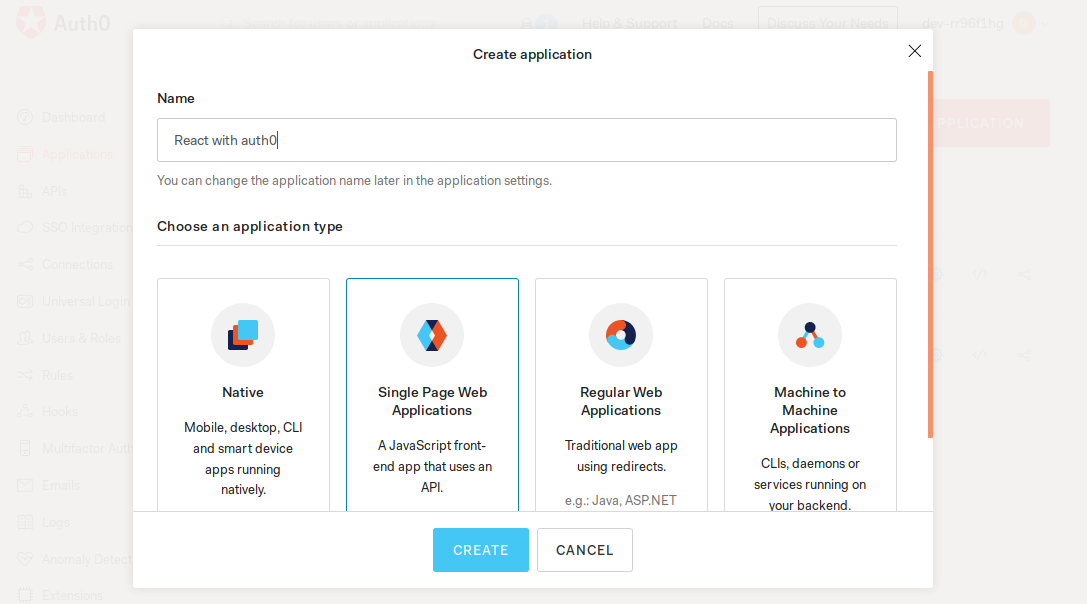
Now its time to create an app in Auth0 to represent our app. Click here to create Application
Dialog box will appear, you will have to insert a name of our application (for example, “React with auth0”) and then choose Single Page Web Application as its type.
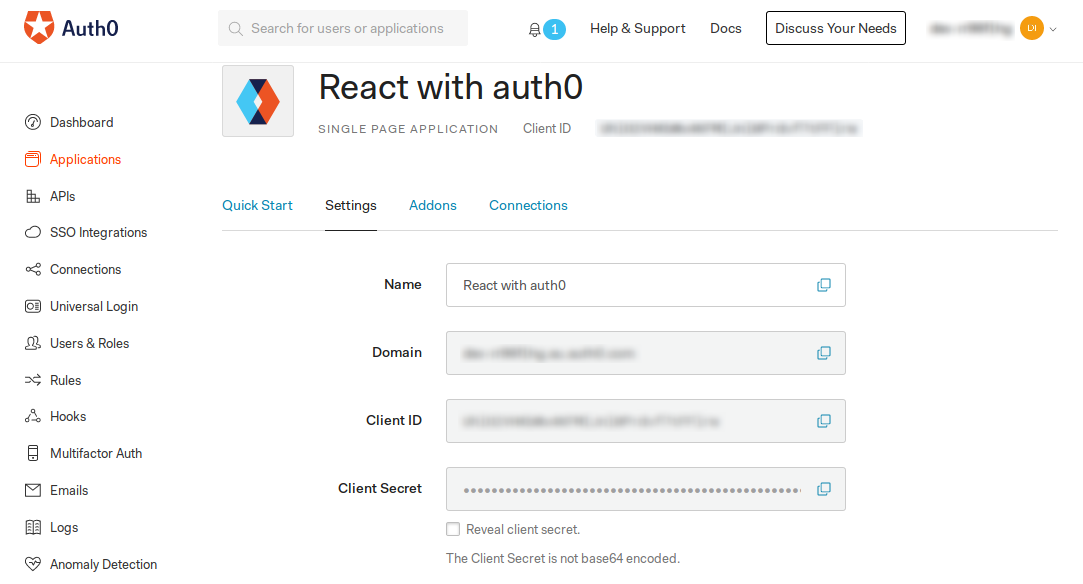
Then click create button, this will redirect you to its Quick start section. Once you complete these steps, you will have to click on the setting tab to change the configuration of your Auth0 application and also to copy some values from it.
Now you are at setting tab, search for the Allowed Callback URLs field and insert your local host url. I'm instering this http://localhost:3001/callback. After insertion of local host URL, you will see like.
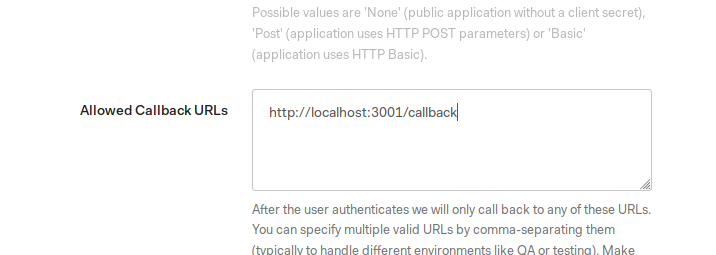
This setup will allow with arigin and allowed login & Logout Urls as below.
.png)
7. Install auth0 in react
npm install auth0-js
8. Get app information from auth0 application's settings
Create a new file Auth.js inside src folder in our react app and insert following code.
import auth0 from 'auth0-js';

class Auth {

	constructor() {
		this.auth0 = new auth0.WebAuth({
			// the following three lines MUST be updated
			domain: '',
			audience: 'https:///userinfo',
			clientID: '',
			redirectUri: 'http://localhost:3001/callback',
			responseType: 'id_token',
			scope: 'openid profile'
		});

		this.getProfile = this.getProfile.bind(this);
		this.handleAuthentication = this.handleAuthentication.bind(this);
		this.isAuthenticated = this.isAuthenticated.bind(this);
		this.signIn = this.signIn.bind(this);
		this.signOut = this.signOut.bind(this);
	}

	getProfile() {
		return this.profile;
	}

	getIdToken() {
		return this.idToken;
	}

	isAuthenticated() {
		return new Date().getTime() < this.expiresAt;
	}

	signIn() {
		this.auth0.authorize();
	}

	handleAuthentication() {
		return new Promise((resolve, reject) => {
			this.auth0.parseHash((err, authResult) => {

				if (err) return reject(err);

				if (!authResult || !authResult.idToken) {
					return reject(err);
				}
				this.idToken = authResult.idToken;
				this.profile = authResult.idTokenPayload;
				// set the time that the id token will expire at
				this.expiresAt = authResult.idTokenPayload.exp * 1000;
				resolve();
			});
		})
	}

	signOut() {
		// clear id token, profile, and expiration
		this.idToken = null;
		this.profile = null;
		this.expiresAt = null;
		this.auth0.logout({
			returnTo: 'http://localhost:3001',
			clientID: '',
		});
	}
}

const auth0Client = new Auth();

export default auth0Client;
Note: you will have to replace <YOUR_AUTH0_DOMAIN> and YOUR_AUTH0_CLIENT_ID> from our Auth0 Application.
9. create a new file called Callback.js inside the src directory and insert the following code into it.
import React, {Component} from 'react';
import {withRouter} from 'react-router-dom';
import auth0Client from './Auth';

class Callback extends Component {
  async componentDidMount() {
    await auth0Client.handleAuthentication();
    this.props.history.replace('/');
  }

  render() {
    return (
      <p>Loading profile...</p>
    );
  }
}

export default withRouter(Callback);
10. Create home page and insert this code into Home.js
import React, { Component } from 'react';
import logo from './logo.svg';
import './App.css';
import auth0Client from './Auth';

class Home extends Component {

	componentDidMount() {
		if (!auth0Client.isAuthenticated()) {
			auth0Client.signIn();
		}
	}

	signOut = () => {
		auth0Client.signOut();
		this.props.history.replace('/');
	}

	render() {
		return (
		<div className="App" >
			<header className="App-header">
				<img src={logo} className="App-logo" alt="logo" />
				{
					auth0Client.isAuthenticated() &&
					<div>
						<label className="mr-2 text-white">{auth0Client.getProfile().name}</label>
						<br />
						<button className="btn btn-dark" onClick={() => { this.signOut() }}>Sign Out</button>
					</div>
				}
			</header>
		</div>
		)
	}
}

export default Home;
11. Update our src/App.js
import React from 'react';
import './App.css';
import { Route } from 'react-router-dom';
import Callback from './Callback';
import Home from './Home';


function App() {
	return (
		<div className="App" >
		<Route exact path='/' component={Home} exact />
		<Route exact path='/callback' component={Callback} exact />
		</div>
	)
}

export default App;
12. Start this by simply inserting command
npm start
After running this your app URL will redirect to auth.
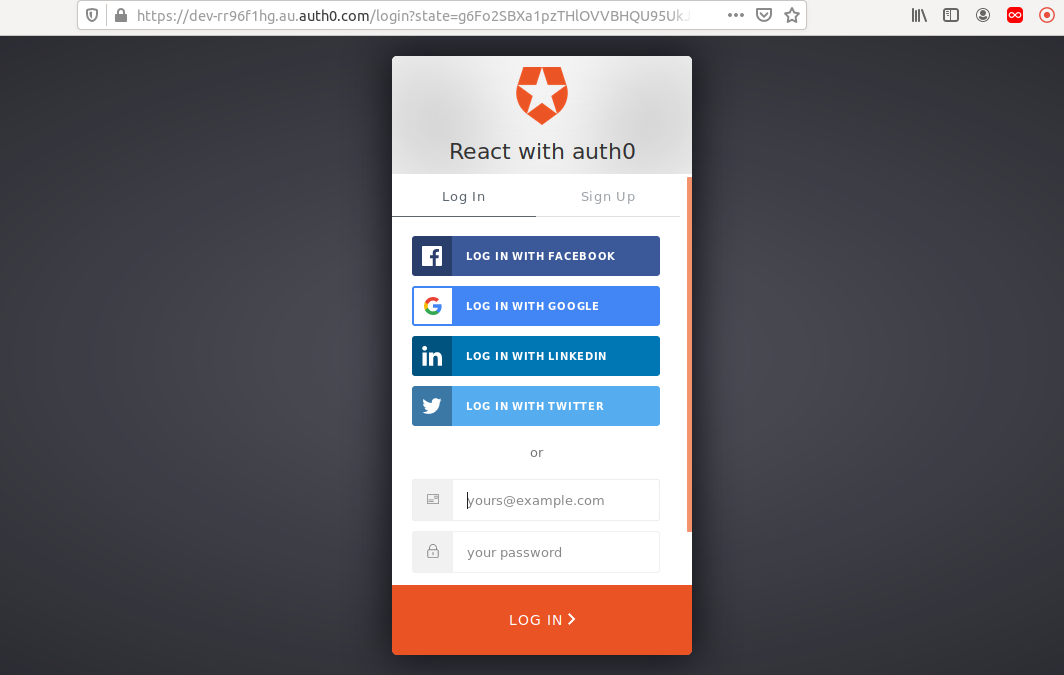
13. Successfully authenticated screen
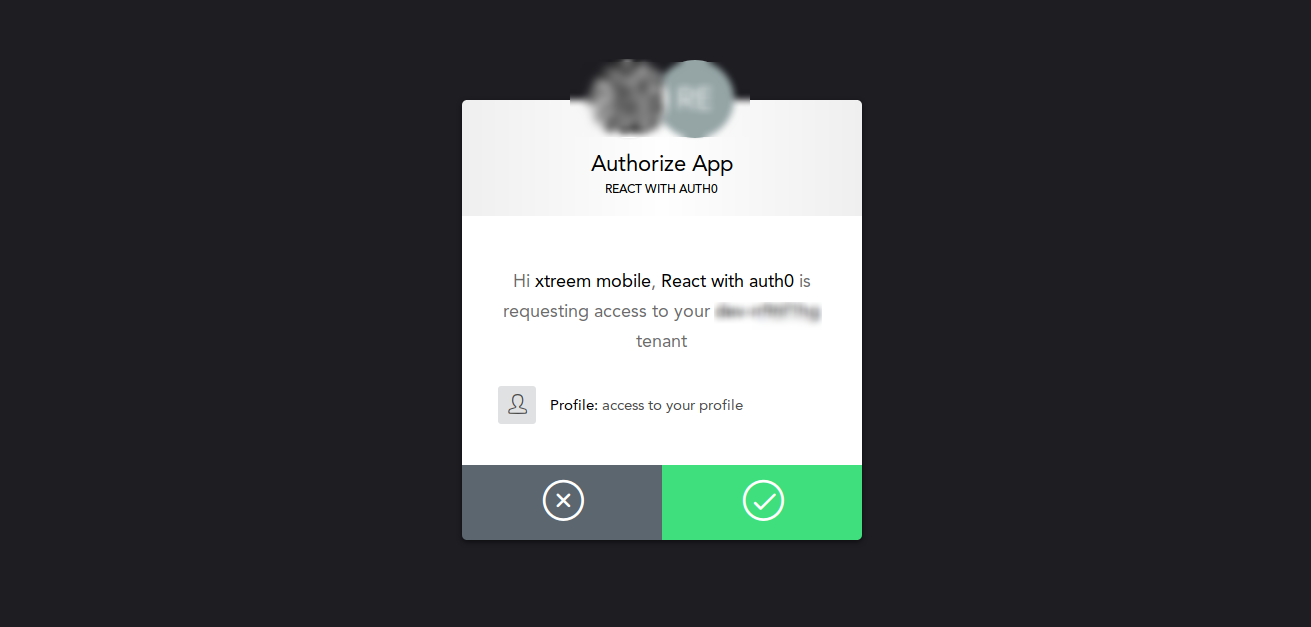
14. When you click on right tick you will be redirected to your site
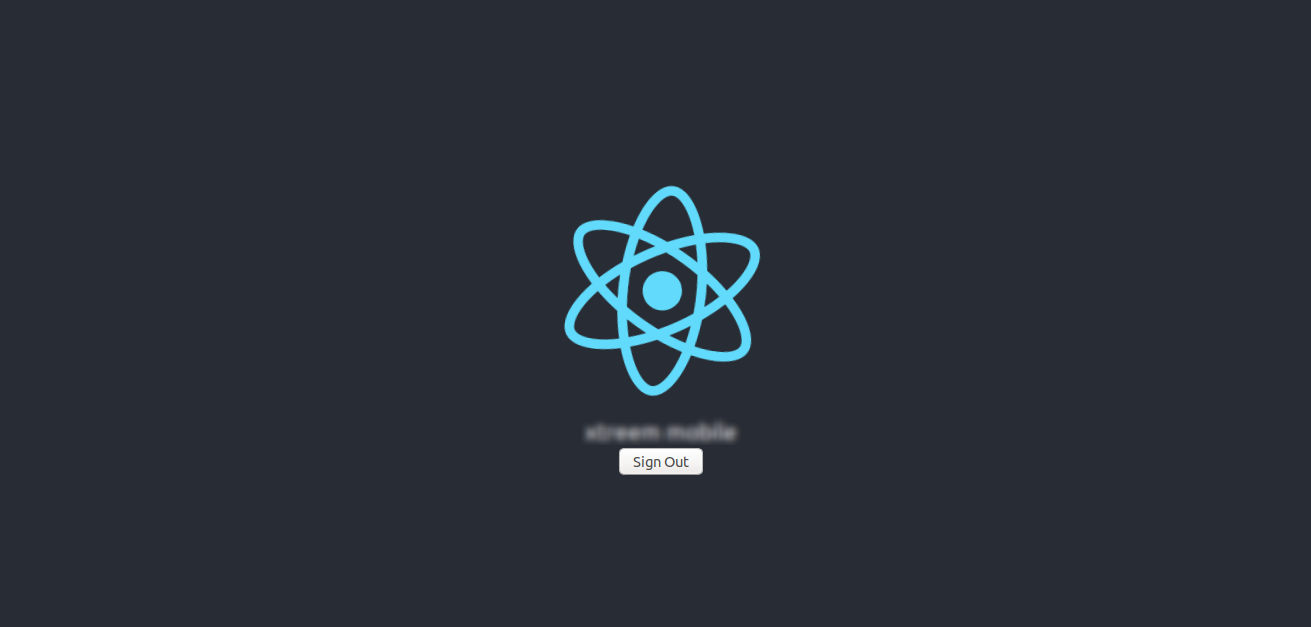
15. You have successfully logged in react js with auth0
If you looking for develop you own web application using react.js you can request a free quotes from us.